Saturday, May 27, 2017

Our River House Fixer Upper - Week 5

Our electrician is still busy working on switching out the old and installing the new wiring.  So while he was busy getting this done, I opted to work on the upstairs spare room.  There are two smaller rooms up there, and one will be the guest bedroom and the other will be a storage/workroom.  Since the electrical re-do was done in this particular room, I decided I would start with it.


First...I needed to sand all the whole room.  So, on went the respirator mask and off to work with the sander and scraper.  It was HOT!!! and NASTY!!! But I completed this step in a few hours.


All sanded


Other side of room


Next step...clean up.  A thorough vacuum, wipe down with tack cloth to ensure no dust or particles in my paint.  Then I started with the primer.  We went with Zinsser primer and we decided one coat was sufficient.  Once that dried, I applied the paint, and thought it had too much of a pink undertone.  At the store the chip did not appear to have any pink tones, but on the wall, it does look pinkish.  The color?  Birchwood White.  Oh well, the paint is purchased and can't take it back, so that is the color it will be.  However, I am not going to use this color on the rest of the upstairs. 


My pinkish workroom


Not bad, but not exactly the color I was hoping for


After the paint job, I cleaned the floors.  I already have rods and curtains purchased for this room, but no install of that until the rest of the house is dust-free!  My plan is to have a work table for possibly some sewing and also space for jewelry making.  It will be a great space with great light coming in through those cute Craftsman windows.  

So, for now...the door is closed on this room.  And it is something I can check off my to do list.  Now on to the next few hundred items on the list.

Until next time...

Enjoy!

Saturday, May 20, 2017

Our River House Fixer Upper - Week 4

 Our house has new plumbing, all new lines under the house and everything in "roughed in"!  We had the plumbers install two outside water spigots, on either side of the house, for my future gardening water needs!  Inside, we opted to go with a tank-less, on demand hot water heater.  The plumbers worked quickly and finished in a couple of days. 


The tank-less water heater mounted under the stairs


Master bath with new plumbing


Our special order bath tub arrived and it is huge.  Captain Man and I are both tall and we like to soak in a nice hot bath after a long day of work.   Most tubs aren't quite long enough for us to stretch out so we bought a six foot tub.  It is also a steeping tub to allow a deeper water fill.


Cannot wait to get into this tub!


And here she is placed in the master bath


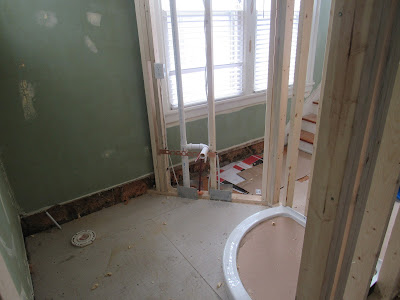
The guest bath also has the roughed in plumbing completed.  It is going to be small, but functional, with a corner tiled in shower.


New plumbing!


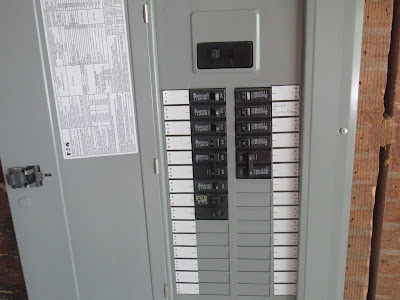
There was a new electrical main panel box installed a few weeks prior.   We are now  re-doing all the wiring.  


New panel box installed some time earlier

Lots of new wiring and sockets and switches.   This house did not have any lighting for the stairs, so we are placing some type of wall lighting along the staircase.


Wiring for new hallway sconces


Our washer and dryer will go into existing closet space that is located in kitchen/dining area.  This is a move from where it was located in this house, so all new electric and plumbing!


Washer and dryer closet


Somewhat fuzzy pic of new outlets


Another busy week at our fixer upper!  A friend of ours passed by this week during his daily walk and stopped to ask "how's it going?"  "Working hard and it is going slowly but surely" was our reply.  He then stated "you two sure love a project, and big ones at that".  Captain Man and I looked at each other and thought for a second "no we don't".  We like to relax and enjoy calm and peace.  What are we doing!!! This is anything but!

Until next time....

Enjoy!

Saturday, May 13, 2017

Our River House Fixer Upper - Week 3

Another week has flown by...and we are moving along on the house.  To me, there aren't many negatives about this house, but there are a couple of issues that Captain Man and I need to work out.  The house only had one small (itsy bitsy) bathroom.   Both of us wanted another full bath added downstairs, but there just did not seem to be enough room to fit one in.  We vacillated back and forth on where we could squeeze one and finally decided we may be able to fit one in at the foot of the stairs.  It would be centrally located on the main floor but easy enough for guests to access at the bottom of the stairs.  But it would have to be small.  So this past week, Captain Man framed up the new bathroom.  And it will be tiny, but should work fine.  


The new tiny bathroom


Another view of the bathroom to be


A half bath would be a bit more spacious, but we really wanted to have room for a shower.  We think it will work.  I have stressed over the placement of the toilet, sink and shower enough now.  Captain Man tells me it will work, so I am leaving that bit of worrying alone for now.  


The master bath ceiling frame up


We have also completed the ceiling framing for both baths.   We are lowering the ceiling in these rooms by 4 inches to allow for ventilation fan installation.   


Ceiling framing


And I have started on the other negative of this house.  Like I said, there are only like 2 things.... the other-removing paint from the trim.  The trim was painted a couple of years ago, but all of it is flaking off.  Reason...originally the trim was painted with an oil based paint...and then painted over with a latex paint.  Not good.  I have researched this quite a bit and cannot find a easy fix.  All recommendations indicate it will require hard work and a lot of time to get it off!  Good luck with that!

I am not particularly fond of all that toxic crap they have for this sort of project.  So, while in Lowes, I found a "safer" citrus stripper claiming to be less toxic than the rest.  I purchased a good respirator mask and chemical gloves and set out to try this product out on the first of three mantles.   After opening all windows and doors (wanted to have good cross ventilation!), I put on my gear and started on the mantle.  It's a gel like substance and I started off with a frugal amount....did not work so well.   After about an hour, no bubbling noted.  So I reapplied with more and left it for about 2 hours, and that worked.  The paint bubbled up and was easily removed on the flat surfaces.


After the first try


Second time was better


The biggest issue, other than being extremely messy and gross, is the trim in this house has lots of nooks, crannies and ribbed moldings.  It is so hard to get into these places to remove the paint.  It bubbles off fine, but I need something to get the paint off those intricate moldings.  There must be some sort of tool made for this, so I am researching for that now.  

Captain Man is telling me this is way too time consuming and we should just scrape off the peeling part, sand it down and repaint with a latex over oil paint and hope for the best.   I am scared to do that, as most of what I have read states you probably need to get all the old paint off or you may have more peeling paint later  😟 

We will see how this goes.   There is a LOT of trim in this house!


The electrician is coming today, and plumbers should be here on Monday.  Captain Man and I both have returned to work, so we are doing this on our "off work" days.  But we are pleased with progress thus far.

Off to work we go!

Until next post....

Enjoy!

Saturday, May 6, 2017

Our River House Fixer Upper - Week 2

Wow.  This past week has flown by and both Captain Man and I are exhausted.  We have worked hard and are pleased with our efforts, but we are sore, scraped, bruised, dinged, scarred and just plain pooped.  We can tell we are not spring chickens anymore!  But the demolition part is mostly done.  Yea!


The original one and only bathroom


Demo day!


Not quite there yet


Still have the tile to get out of there


That bathroom was tough.  It was clear that this bath was a redo from the original and there were lots of nails.  The tile in the shower and around the toilet are attached to cement backer board.  We had to remove the tile, which is heavy and the board, which is super heavy.  After two days of cutting, banging, twisting, bending, and hauling...this bathroom is gutted.  I can tell you...Chip Gaines I am not.  I do not like demo days!

We also wanted to remove the wall between the existing kitchen and a back room.  This only took us about a day.  It opens up the kitchen and hopefully we will be able to install a bar/island where the wall was. 


One side being removed


And the other side gone


Studs removed


We will have to keep one of the beams, as it is a load bearing beam...but I am okie dokie with that, will just build and remodel around it. 

Next job, tear out the kitchen cabinets.  These were really outdated and in our opinion not salvageable.  I really did try to see if we could keep some of them, by painting or glazing or something, but just could not come up with a plan to use them.  Captain Man stated they were not made very well so we opted to scrape them.  And we did.  


Doors off


Captain Man hard at work


That side done


Other side done


We got a 15 yard dumpster delivered to the house, and after this week's demolition...it is full!


More stuff was added today


We have some more clean up to do, but for 2 weeks of hard, hard work, we are pleased with our progress.  I am so happy this part is over.   Now, the really fun part begins...I think?

Until next time...

Enjoy